The Inspired Journey Hosting File Manager
Forget about FTP clients with our File Manager

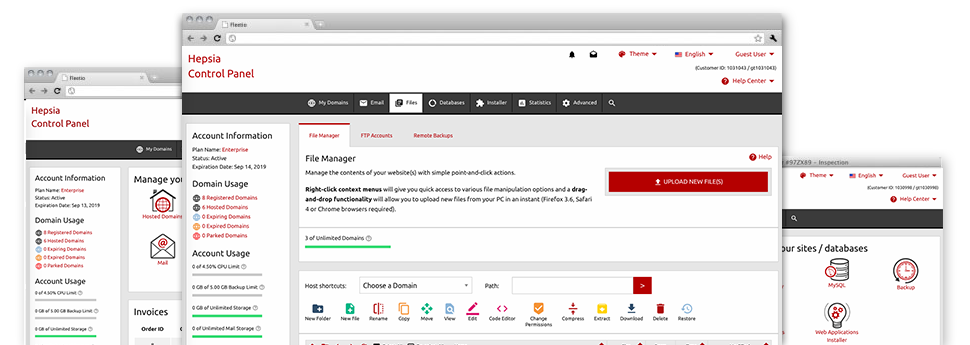
We provide you with a drag–and–drop File Manager, which features a collection of easy–to–use applications like a built–in graphic viewer and a selection of file writers. You could make rapid uploads, archive/unarchive data files, modify permissions and much more. The software tools are well–organized and simple to get through with big action buttons and right–click context navigation. Take a look at the different software instruments and characteristics built in the Inspired Journey Hosting File Manager.
Drag ’n’ drop file upload options
Transmit files to your websites effortlessly
The File Manager in your Web Site Control Panel features a fast, drag’n’drop function that will assist you to move data files between your personal computer and your hosting profile without needing to use an FTP (File Transfer Protocol) tool. You can easily pull data files from your personal computer and drop them in your Web Site Control Panel with a click of the mouse by using a secure SSL connection.
The drag–and–drop feature is integrated into the Web Site Control Panel, therefore, you do not need to set up any third party computer software to work with it. It also works well on all leading Operating Systems, so all you should do to apply it is log into your File Manager.
Right–click context menus
See each of the available file managing possibilities with simply a click of the mouse
On account of the right–click menus we have integrated in the File Manager, you’ll be able to modify all of your files incredibly easy. Click on a file or directory and through the panel which will appear, opt for the actions that you want. You’ll be able to rename, copy, move, download, edit, preview, archive, unarchive and delete any chosen file. If you click on a folder, additionally, you’ll view the solution to create a completely new sub–folder or file inside it.
Whenever you choose numerous files or directories, you are able to use identical procedures to all of them at the same time.
Archive/Unarchive files
Work with enormous files easily
Due to the in–built archive/unarchive option, the File Manager will let you work with enormous files and not having to use FTP. You’ll be able to pack a directory into a lightweight size by simply clicking on the Compress button or get the contents of an archived folder using the Extract button. Whenever compressing a directory or a group of files, it is possible to choose the archive extension (.ZIP, .RAR or .TAR.GZ) and also the title of the archive file.
Integrated file editors
No third–party software is necessary
We’ve integrated a set of file editors in the Web Site Control Panel so that you can generate easy and quick adjusts to your files and never have to use third party software packages. Inside the File Manager you can find a WYSIWYG editor that can assist you check all the recent changes that you make immediately, a code editor that features syntax accentuating for your personal .JS or .PHP files, and also a plain text editor for more competent customers. Any changes which you generate and save are going to be shown right away on the web.
You have access to the file editors using the buttons at the top of the file table or by right–clicking a particular file/folder.
A logical folder structure
All of your files arranged in a straightforward way
All of the files within your website hosting account are organized into folders. Every host does have its main directory, which follows the file hierarchy which you have pre–set. Using this method, it is very easy to handle all your hosts from one place without chance of getting lost or puzzled.
By default, you’ll see all the hosts indexed in a table and if you click once over a given host, you will see the whole set of sub–folders and files associated with it. By clicking on twice, you are going to visit a page that is centered on that host only. A different way to load the folder associated with a certain host and to use it solely, is to try using the drop–down menu at the top of the main File Manager file table.
A user–friendly interface
A File Manager devised for real people
Working with your files is natural and simple when using the Inspired Journey Hosting Web Site Control Panel. You’ll try a file control environment that is very close to your desktop PC’s file explorer. You are able to drag and drop files and deal with all of them with a right mouse–click. When using the included review solution, you can observe pics just like they will be online, and throughout the built–in file editors you can easily make adjusts in your files right away.
If you need assistance taking care of your files, you can refer to the huge set of posts and how–to training videos, which you could get with just a click of the mouse.
Work with multiple files
Transform an array of files all at once
The File Manager can help you save a lot of time when you use numerous files. You can pick different files simultaneously and use a desired activity to them like you do on your desktop machine or laptop. To pick arbitrary files at the same time, just press the Control key, and to select a group of adjoining files, press the Shift key. It’s that straightforward.
After getting picked the files, you can actually instantly transfer them to a different spot making use of the drag–and–drop option. By means of the right–click contextual menu along with the buttons above the file table, you’ll be able to apply a myriad of other actions – it’s possible to copy, rename, delete, download and change your files, alter file permissions, etc.
Quick & simple password protection options
The easiest method to protect your information
There’s one typical technique to guard a folder with a pass word – by making an .htaccess file. If, however, you are not technologically skilled sufficiently, you’ll have difficulties doing it on your own. To help make things simple, we’ve designed an easy–to–use password protection user interface to the File Manager available within the Web Site Control Panel.
To use this option, just right–click on a directory and choose Password Protection. Following that set the login name as well as the security password that you want to employ and then press the button. That’s all. Now the picked directory is hidden by the standard users and will be available just to authorized account holders.


